Access the primary EXACT functions from the menu bar at the top of the screen:
The content of these menus may vary by user permissions, practice setup, installed modules and geographic region.
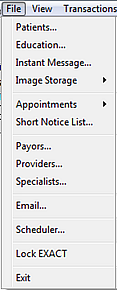
File Menu
|
Patients... Opens the patient file at the DetailsTab. |
|
|
||
Education... The Patient Education Window is a console for managing and running full-screen educational slide shows. |
||
Instant Message... Instant Message enables fast text communications between EXACT users on a network |
||
Image Storage > |
||
Compress Images... Compress various types of image to improve storage. |
||
Restore Images... |
||
Appointments > |
||
Main... Loads the default Multicolumn Appointment Book displaying multiple Providers for the current day |
||
Multiday Appointment Book... Loads the Multiday Appointment Book, which can display 5, 7, 14 or 28 days of appointments on the screen |
||
Single Column Appointment Book... Loads the Single Column Appointment Book where the column is divided into View Week and View Day areas |
||
List Appointments... Select List Appointments to list patient arrivals and departures, as in the Arrivals and Departure tabs. |
||
Short Notice List... This link opens at the Short Notice List SCREEN. |
||
Payors... Opens the Payor File window, where you can add or edit Payors (schemes that subsidise treatment) |
||
Providers... Opens the Provider File Window where you can add or edit Providers (Clinicians) |
||
Specialists... The Specialist File is an address book for storing details of the specialists and referral sources that your practice uses |
||
Email... Opens the Email Inbox for viewing and responding to incoming Email |
||
Scheduler... With Scheduler you can automate EXACT events |
||
Lock EXACT Use when you leave your computer. This locks EXACT and displays the Login dialogue on a blank EXACT screen. It does not close down the program. Login normally to unlock and continue. |
||
Exit Close the EXACT software. To use EXACT again you'll need to run it and then Login. |
View Menu
|
View Transactions... If a patient is selected in the Patient file, this will open the Patient Transactions window. |
View File... (view a Patient list from which to select a Patient File) If you already have the Patients desktop open this opens the View Patient window. If the Patients desktop is not open selecting View File... will have no result. With the Patient desktop open you could also open the View Patient window by these means: - Press F4 or - Press CTRL-L or - Click the View Patients button: See also: View Patient window | Patient Search |
|
Link To...
|
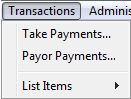
Transactions Menu
|
Take Payments... Open the Patient Payments window to process a payment. |
List Items > |
|
List Adjustments... |
|
|
List Discounts... View a list with columns for Date, Type, Transaction Number, Invoice Number, Provider, Entered by, Patient Details, Amount, Amount Open. Actions: View full details of a Discount, Print the list of Discounts, Delete a Discount. |
|
List Invoices... Actions: Show allocations for the selected invoice, Print an invoice, Print the list of invoices, Delete selected invoice/s, Add further allocations to an invoice. |
|
List Payment Bundles... View a list of Payment Bundles with columns for Date, Type, Number, Providers, Payment Method, Deposit Amount, Amount. Actions: Update a Payment Bundle (adds new receipts or adjustments), Edit a Payment Bundle, Print the list, Delete a Payment Bundle. |
|
List Payments... View a list of Payments with columns for Date, Type, Printed or not, Receipt Number, Deposit, Provider, Payment Method, Entered, Patient Details, Amount, Amount Open, Receipt Type. Actions: View the details of any Payment, Print a Payment, Print the list of Payments, Delete a Payment. |
|
List Transfers... All or part of the monetary value of a patient transaction can be transferred to another patient, or payor. This is commonly used if one cheque is being processed to pay more than one account. See also Transfers. |
|
List Courses of Treatment... From the List Courses of Treatment window you can view details of current patient CoTs and you can perform actions with a selected patient / CoT. |
|
List Write Offs... List all write-offs. Actions: Print the list. Display information on a selected write-off, delete selected write-offs. |
|
List Contacts... List the Contacts with patients, with columns for Date, Type of Contact, Patient Name, Specialist, Description of the Contact, Creator of the Contact, associated Contact List (where applicable), Body Text (where applicable) Actions: View full details of a selected contact, Edit details, Print details, Delete a Contact. |
|
List Estimates... View a list of Estimates with columns for Date, Type, Printed or not, Emailed or not, Estimate Number, Provider, Patient Details, Amount. Actions: View full details of a selected Estimate, Print Estimate, Print the list, Delete. |
|
List Prescriptions... View a list of Prescriptions with columns for Date, Type, Printed or not, Emailed or not, Provider, Patient Details, Prescription Item details. Actions: View details of a prescription, Configure prescription items (Edit, Add new, Delete), Print a prescription item, Delete a prescription item. |
|
List Statements... View a list of Statements with columns for Date, Type, Provider, Person who entered it, Patient Details. Actions: Delete a Range of Statements, Delete the selected Statement. |
|
List Xrays...
|
|
List All Transactions... View a list of all transactions with columns for Transaction Number, Date, Name, Transaction Detail, and the Amount |
Administration Menu
|
Reports... Open the Reports screen with a menu of reports. |
|
Statement Run... Use the Statement Run to print statements for all patients who owe money as at a particular date (usually the current date). A Statement Run is normally performed once a month, or at other regular intervals. |
||
Run Batch Invoices... Run the Batch Invoice Process, with the (checkbox) option to Print the Invoices as they are created. |
||
Wait Lists... |
||
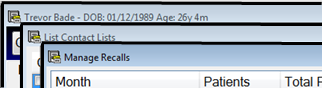
Manage Recalls... The Manage Recalls screen is the main management interface for monitoring and managing recalls. It displays a month summary per line, with an Effectiveness summary bar chart in colours that represent the Recall-health of the Practice: |
||
Marketing... The Marketing desktop enables practitioners to track and manage campaigns. |
||
Contact Lists... A Contact List is a list of patients who match selected criteria. Contact Lists are used extensively throughout EXACT, so should be understood by all practitioners. |
||
Manage SMS Replies... The Manage SMS Replies screen lists all the SMS messages that were received by the practice that were either not automatically processed by EXACT, or were added to the SMS Replies list because the settings in EXACT directed them to be. These specific SMS replies may require user intervention. |
||
Tasks > |
||
Tasks... Tasks is a dental practice "To Do List" that allows users to create and monitor tasks that have implications for the Appointment Book. |
||
New Task... |
||
New Task re Patient... Similar to the above New Task, but specifically in relation to the currently selected patient. |
||
|
||
Search and Change... The Search and Change wizard enables you to search for specific patient records and change them. |
||
Delete Aged Data... Use the Delete Aged Data tool to delete dental records that exceed the regulated record-retention age in the UK. The tool can optionally be used in other regions. It partially automates the process of identifying, checking and deleting patient aged records. This tool is only accessible to Administrator-level users. It needs to be used with care as it can potentially delete important data. Please create a complete backup before using this tool. |
||
EasyPost Job Monitor... Use the EasyPost Job Monitor to Track the status of manually-generated and automated EasyPost recall jobs. |
||
|
Configure Menu
|
Appointment Book... Users with appropriate security access can configure the appointment book appearance to optimise viewer interpretation. |
Email Templates... Create email templates to enable quick, easy, standard-appearance email messages. |
|
SMS Templates... |
|
Patient File... EXACT |
|
Patient Payments... Configuring Patient Payments |
|
Patient Query Templates... Lists the Query Templates in use by the practice. Query Templates are used throughout EXACT as a means of specifying sets of patients. Actions: View and Edit a selected Query Template, Add a new Query Template, Delete a Query Template, Import a Query Template (as .CSV), Export the selected Query Template (as .CSV) See also: Selecting patients by means of Query Templates | Using existing Queries | Creating a new Contact List |
|
Customise Workspace... Customise the workspace bar across the top of the screen to suit the way you work. Customisation is per user your Login. |
|
3D Charting... The first time that the 3D Chart is activated, a 3D Chart Setup Wizard will appear to take you through the configuration. The wizard needs to be run only once on each workstation. You can manually run the 3D Chart Setup Wizard from the Configure > 3D Charting at any time to change settings if there are hardware changes. |
|
Custom Screens... Configure a Custom Screen. Use Custom Screens to design customised data entry windows that can be attached to various parts of the EXACT program. Custom screens are usually attached to service items, although they can also be used to record medical history and create extra tabs in the Patient File window to record specialised information. |
|
Prescription Items... Any items that you wish to prescribe need to be added into EXACT. Patient prescriptions are issued, stored and viewed from the patient Prescriptions tab. Add prescription items from Configure > Prescription Items... |
|
Services... Configure Services in the Service File (List Service Items screen, Using the List Service Items window (Service File)). |
|
Import Files... First backup your database. Select Import Files to locate and import a CSV file. |
|
Export Files... Export a Table as a .CSV file (select the table from a dropdown menu and then save to a folder) |
|
Security... Open the Security Window. From here a user withs Administrator permissions can set security rights for areas of the software. |
|
Practice Information... Use the Practice Information window in the Configure menu to enter and maintain various practice details, and to register EXACT modules. |
|
License Manager... Use License Manager to see how many licensed computers you have and when the licences expire, see how many free (unused) licence slots you have available, see which computers are currently logged into EXACT, or if they are not logged in, when they last were, delicense computers that are no longer in use, or about to be retired from use with EXACT, so that you can use their licence on another machine, relicense computers that you have previously delicensed, or request extra licences to allocate to other PCs. |
|
Workstation Update... Configure how your workstations update their EXACT software: either automated (hands-free) or customised via Administrator-level login. |
|
Printing Setup... Use the Printing Setup to configure a printer for each computer. You can also specify this printer as the default stationery printer for the entire practice. |
|
Add User / Provider... This enables easy wizard-based setup of a system user, for all roles in the dental practice. |
|
User Settings... Configure User Settings for a named user, on any computer where that user has logged into EXACT. |
|
Settings... This is a password-protected area of EXACT where authorised users can access and change settings. |
|
Online Appointments... Configure Online Appointment Bookings from within EXACT. |
|
Email Parameters... Configure Email Parameters. This may require some technical knowledge. |
|
Automatic Appointment Reminders... Use Configuring Automatic Appointment Reminders to configure EXACT to automatically send appointment reminders to patients in SMS, Email and EasyPost. |
|
Automatic Appointment Follow Ups... This feature enables EXACT to automatically send patient appointment follow-ups by SMS, Email and/or EasyPost. If you use SMS, EXACT can automatically reply with a second follow-up SMS. See Configuration options, Configure up to three appointment first follow-ups and Configure the optional second follow-up. |
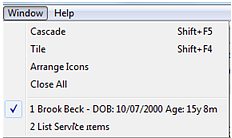
Window Menu
|
Cascade (Shift-F5) Select to cascade the open windows within EXACT behind each other:
|
|
Tile (Shift-F4) Select to tile the open windows alongside each other within EXACT:
|
||
Arrange Icons
|
||
Close All Close all of the open windows. |
||
|
||
List of open windows 1. 2... Click any of these listed open windows to jump to that window. |
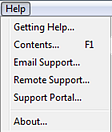
Help Menu
|
Getting Help... Pops up a window with the Phone, Fax and Email of the local Support Desk. |
Contents... (F1) Opens the Help documentation at the Main contents page. |
|
Email Support... Opens your EXACT Email Support area, from where you can Create New Email Now to draft an Email to the Support Desk. |
|
Remote Support... Opens a Remote Support page from where you can connect with a Support Desk member. |
|
Support Portal... Requires an Internet connection. Opens the Software of Excellence Portal, from where you can read Blog articles, watch videos, read Knowledge Base articles and download the latest software. |
|
About... Opens an About window with detailed information on your EXACT system, including EXACT version and date installed, country, installed modules, Add-ons, current database in use, name of the server, names of client workstations, Actions: View details of any workstation or server computer, Print a list of all system computers, Delete a computer from the system, view a list of all databases in the EXACT system with their locations and sizes. |