Parts of the Multi-column Appointment Book Window

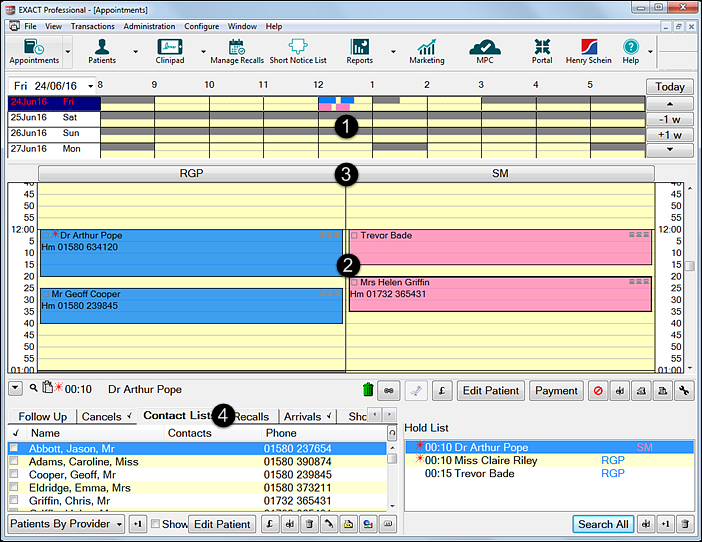
There are four main parts to the multi column appointment book:

Multi Appt Book areas

nums-20x20-bw-01

The View Week Area - which displays a graphical representation of the appointments booked for the days viewed.

nums-20x20-bw-02

The View Day Area - which displays the patients booked for the selected day.

Right-click appointments to see a menu of actions.

nums-20x20-bw-03

The Provider Bar – is used to widen the Provider column and allows access to the View Month and the Restrict Appointment Times window where working hours and holidays etc can be edited for the selected provider.

nums-20x20-bw-04

Activity Area – is used to access extra options:

  • Clipboard – a temporary storage place used to move appointments to a new date or time. The clipboard is always available in the Appointment window whether the Activity Area is expanded or not. For this (and other) reasons, it is a very useful tool for making and editing appointments.
  • Searching from the Hold List – a temporary storage area for appointments viewed only when the activity tabs are expanded.
    You will be able to view appointments that are sitting on the clipboard in the hold list. Double-clicking on the clipboard performs the same action as clicking on the +1 button under the hold list.
    The hold list can be used as a useful search function for appointments.
  • Follow Up Tab – lists appointments that need to be followed up.
  • Cancels Tab – lists appointments by status e.g.: planned, confirmed, cancelled, re-booked, completed, deleted and failed.
  • Contact Lists Tab – Holds existing contact lists, allows the creation of new lists and booking of appointments directly from the lists.
  • Arrivals Tab – Holds patient appointments for all Providers in order of appointment time for the selected day.
  • Recall Lists Tab – Holds all current recall lists. patients can be contacted from this tab.

Note that the relative size of each of the View Week, View Day and Provider Bar areas can be changed as required, by clicking on the bar separating two adjacent areas, and dragging it with the mouse.

See also...

The Multi Column Appointment Book

Using the Multi-column Appointment Book

View Day Area

View Week Area

Next >>

View Day Area