![]()
The appointment length and patient name is displayed to the right of the Clipboard.
WARNING: Appointments held on the clipboard will not be saved when the Appointment book is closed, but you will see a warning on screen when you attempt to close the Appointment book.
Purpose:
The clipboard is a quick and useful tool to set patient appointments because it is easily accessible from many windows and screens. It enables temporarily storage of patient appointments until practitioners can locate appropriate time/date slots.
Updates in EXACT v12.2:
To list appointments in the clipboard
From the appointment book:
From Add Patient or Edit Patient window:
Clipboard actions:

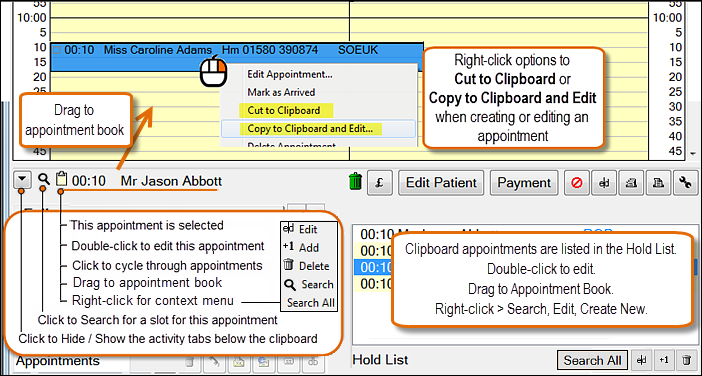
Right-click the clipboard, appointment length or patient name to view a context menu.
List multiple appointments on the Clipboard and click to cycle through them.
Drag a clip to the appointment book to create a booking.
Run an appointment search for one clipboard-listed appointment.
Run a Search All for purposes of co-ordinated appointments.
Double-click to edit the appointment.
Note that Clipboard appointments are simultaneously listed in the Hold List from where the Hold list functions apply: Edit, Search, Create New.
To search for a an appointment slot from the Clipboard
![]()
or
To search for ALL clipboard appointment slots
Right-click the clipboard and select Search All from the context menu.
The Appointment Time Search window is the same as for the Hold List Search All feature.

To delete an appointment from the clipboard
Either
or
![]()
To add a new appointment from the clipboard
See also:
To Move an Appointment Using the Clipboard
To Move an Appointment Without Using the Clipboard
NOTE: If an appointment listed in the Clipboard becomes deleted, invalid or completed, when you attempt to drag it to the appointment book you will see a message
'The corresponding planned treatment on the patient's chart tab has either been completed or no longer exists. Do you still wish to book this appointment?'
Click YES to still book the appointment and link it to the Chart tab. Click NO to not book the appointment.