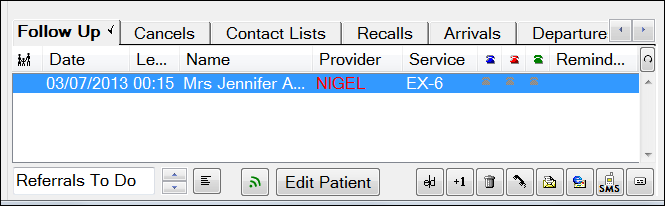
The Follow Up tab displays a list of patients for whom there needs to be some Follow Up action taken.
Examples include post-treatment checks or adjustments, or patients who would like to come in earlier than their booked appointment if there are any cancellations.
The list is sorted by the follow up date entered.
The Communication column displays Email or SMS icons representing reminders that have been sent to patients.
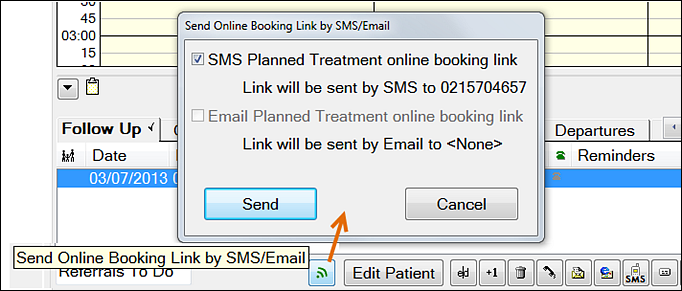
You can re-send a patient Online Booking Link by selecting the online booking button.
The button bar functions are explained below.
To move or copy appointments to the Follow Up area
You can CTRL-drag or copy an appointment from the View Day area to the Follow Up list by selecting it and holding down the [Ctrl] key while dragging it with the mouse.
When you drag an appointment or copy it from the appointment book to the Follow Up list, as you drop it you are prompted to enter a follow up date and specify a follow up list:
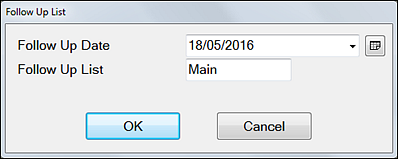
This defaults to the current date, but can be changed by using the ![]() button or clicking in the date box and editing the date.
button or clicking in the date box and editing the date.
To create a reminder Note about a Follow Up List entry
Once you have placed an entry in the Follow Up list, a note can be made to remind you why the patient is in the list.
This will open the Edit Appointment window.
To create an appointment by dragging from the Follow Up List into the appointment book
Drag an entry from the Follow Up list directly to the appointment book to make an appointment for the patient.
NOTE: If an appointment listed in the Clipboard becomes deleted, invalid or completed, when you attempt to drag it to the appointment book you will see a message 'The corresponding planned treatment on the patient's chart tab has either been completed or no longer exists. Do you still wish to book this appointment?' Click YES to still book the appointment and link it to the Chart tab. Click NO to not book the appointment.
Re-send the patient Online Booking Link
This applies to Planned Treatment/Single Patient URL from EXACT v12.1 and later.
Once the online booking link has been sent from the Appointment Workflow departure task list, it is also made available from the Follow Up tab, for re-sending the link to the patient as a reminder.
To re-send the patient Online Booking Link after initial sending from the Appointment Workflow
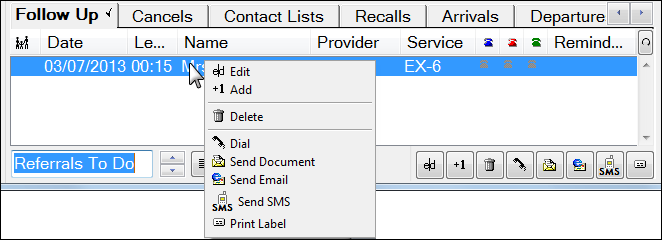
Buttons
The button bar at bottom right is duplicated in the right-click menu:
|
This applies to Planned Treatment/Single Patient URL from <exact v12.1 onwards. Once the online booking link has been sent from the Appointment Workflow departure task list, it is now also made available from the Follow Up tab, for re-sending the link to the patient as a reminder. Simply select the patient and click the button. |
|
Click this to view or edit the details of the patient highlighted in the list on the Follow Up tab. |
|
Highlight an entry in the Follow Up tab then click this button to open the appointment for editing. |
|
Click this button to create a new Follow Up appointment for the current patient. |
|
This will remove the current follow up appointment from the Follow Up tab. |
|
Click this to open the 'Call Patient' window, to enter notes about a telephone call made to the highlighted patient about the appointment. A record of this will be saved on the Contacts tab for the patient. |
|
Click this to create a letter to the highlighted patient about the appointment. A record of this will be saved on the Contacts tab for the patient. |
|
Click this to create a mailing label for the letter to the highlighted patient about the appointment. |
|
Click this to create an email to the highlighted patient about the appointment. A record of this will be saved on the Contacts tab for the patient. |
|
Click this to create an SMS about the appointment to send to the highlighted patient . A record of this will be saved on the Contacts tab for the patient. |
Follow Up Lists
At the bottom left of the Follow Up tab, there is a field which displays the name of the current Follow Up list.
In the example below it is a Follow Up list called Main.
You can change lists by using the ![]() button or by clicking the
button or by clicking the ![]() button to display available lists, and click the one required.
button to display available lists, and click the one required.
All Follow Up lists can be displayed, regardless of which appointment book is currently in the Appointment Book window.
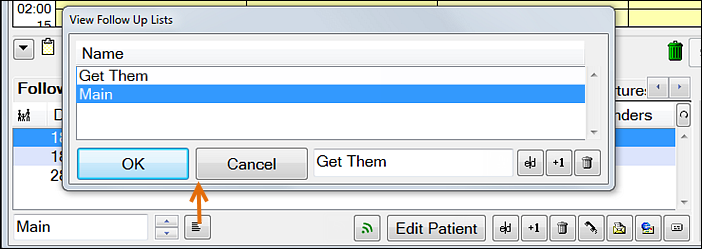
Lists can be created for whatever specific purpose you have. When created, the name of a Follow Up list defaults to the name of the appointment book. In the View Follow Up Lists window, you can use the Edit button to edit the name of the currently highlighted list, and give it an appropriate name of your own.
Click the +1 button to create a new Follow Up list.
To delete a Follow Up list, highlight it then click the Delete (Trash) button.