To set the appointment colour and treatment plan colours for providers, go to File > Providers.
To set the colour and financial details for a Provider
From the File > Providers screen, Details tab...
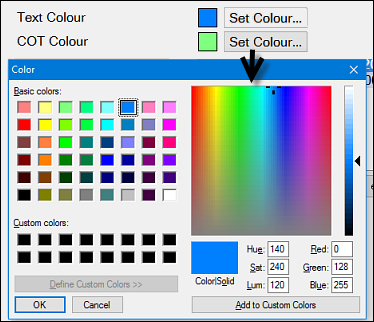
Click the Set Colour buttons to set colours for Text Colour and COT Colour.
Ensure that the text colour is easily readable.
TIP: When setting text colours, choose a slightly darker shade of the Treatment Plan and appointment book colours, for the ‘Text’ colour. This will ensure consistency throughout the program.
Click OK to save your changes.
Set the financial details as described below:
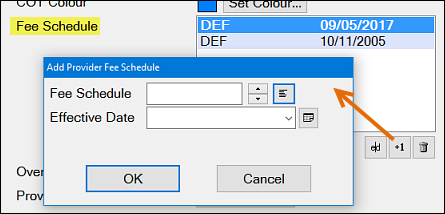
Fee Schedule:
This field sets the fee schedule the provider will use. The Default fee schedule is DEF. Change to an alternative fee schedule if required.
Add, Edit and Delete from the Fee Schedule area.
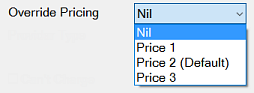
Override Pricing:
This setting overrides the Patients Price Code (1-3) setting in the Patient File.
By default this is set to Nil, which constrains EXACT to use the Patient’s Price Code.
However, if you specify a specific Price Code, all fees recorded by this provider will be from the specified price code set in the Fee Schedule.
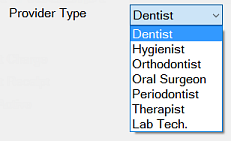
Provider Type:
Identifies the Provider’s speciality:
Provider No.
If required, specify the Provider’s code number.
An Australian Company Number (ACN) is required for some Providers for tax purposes.
An Australian Business Number (ABN) is also required for some Providers for tax purposes.
Can’t Charge
Use the check box to prevent the provider from charging. Generally, this is used only if the provider charges under an alternative provider code or becomes inactive.
Can’t Receipt
Use the check box to prevent the provider from being available in the ‘Patient Payments’ window.
Not Active
Use the check box to identify Providers who are no longer practicing at the practice. All provider details and transactions are still visible but the provider is not displayed in various areas of EXACT.
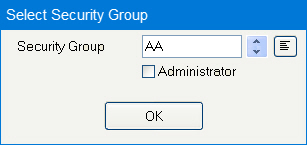
After entering the above settings, click OK to display the Select Security Group window:
Select a security group for the Provider and click OK again to save the basic Provider settings.
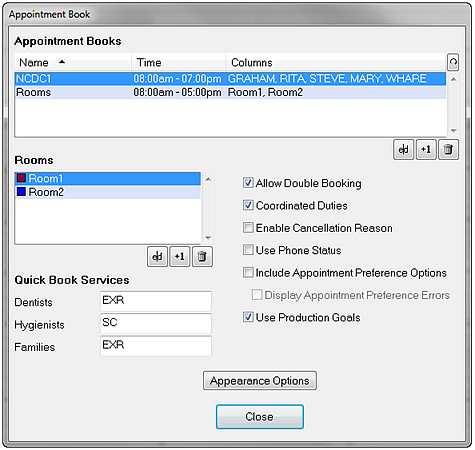
Other Appointment Book Appearance options
All other appointment book appearance options can be set under the Configure > Appointment Book menu option.
On this screen , there is an button. Click this to access and edit the appearance options, including colours.
Users with appropriate security access can customise the appointment book appearance to optimise viewer interpretation.
To customise the Appointment Book Appearance
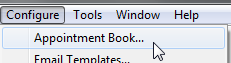
Click Configure > Appointment Book... to display the Appointment Book window:
Click the Appearance Options button to open the Appointment Book Appearance window:
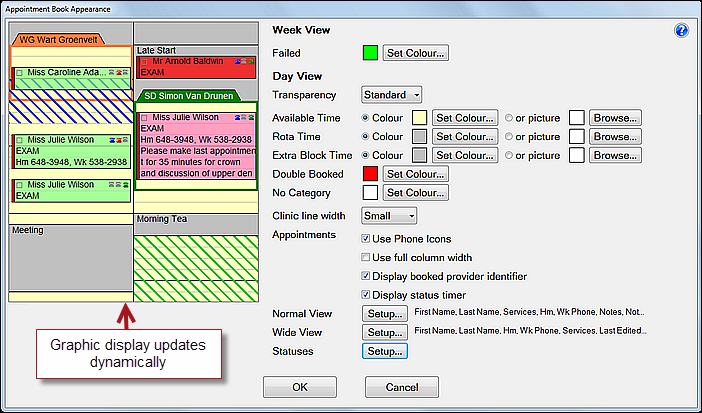
Change the parameters at right and view your changes in the dynamic graphic display at left (see parameter explanations below).
Check that you haven't used the same colour for conflicting options, such as white for both 'Available time' and 'No Category', and then click OK when finished.
Week View Options:
Colour week view by
Not displayed in the preview graphic display.
This is the default Practice-level week view. It can be overridden per user from Configure > User Settings.
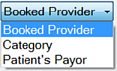
Colour the week view by Booked Provider, Category, or Patient's Payor, depending on which you find the most useful to visually differentiate appointments.
Failed
Highlight the FTA (Failed To Arrive) appointments with a custom colour.
Day View Options:
Colour day view by
This is the default Practice-level week view. It can be overridden per user from Configure > User Settings.
Differentiate appointments in the Day View according to one of three sets of colours:
The colour of the appointment Category code (usually used only for clinics), or
The colour assigned to the Patient's Payor.
Transparency
Set the degree of colour Transparency: None, Standard, Medium or High.
(picture as background)
See below for how to use a picture as a background.
Available Time
Available Time is used for:
Blocks of times not yet assigned to an appointment
Clinics
Time assigned as otherwise unavailable.
Rota Time
Permanent time assigned for providers on rotas.
Extra Block Time
Appointment book time blocked off as unavailable for patient appointments, including meal breaks, staff meetings or training. By default this is grey.
Double Booked
This time shows up on the appointment book when any appointment book time overlaps, apart from available time. Use a bright, distinctive colour for this.
No Category
Appointments booked with no treatment category.
Clinic Line Width
Time booked for clinics is shown as diagonal stripes on the appointment book: from the top-left to bottom right for payor clinics, and from the bottom left to top right for private clinics. Set the width of the stripe to either small, medium or large.
Use phone icons
Optional indicator: . Displayed in greyed-out mode, and can be clicked to show patient contact status. Status displays must be decided per practice.
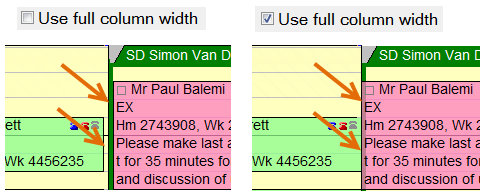
Use full column width
Leave this unchecked to overlay appointments within clinics or blocks, or check to use the full column width:
Display booked provider identifier
Many practices historically coloured appointment blocks by Provider. When coloured by Status (stage of care) there is an option for a vertical colour indicator that identifies the Provider for the appointment (EXACT version 11.3 SP5 and later).
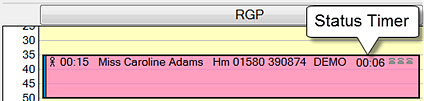
Optionally add a Status Timer (hours:minutes) to the appointment book for these Statuses / stages of care while the patient is physically within the practice: Arrived, In Chair, Treatment Completed (EXACT version 11.3 SP5 and later).
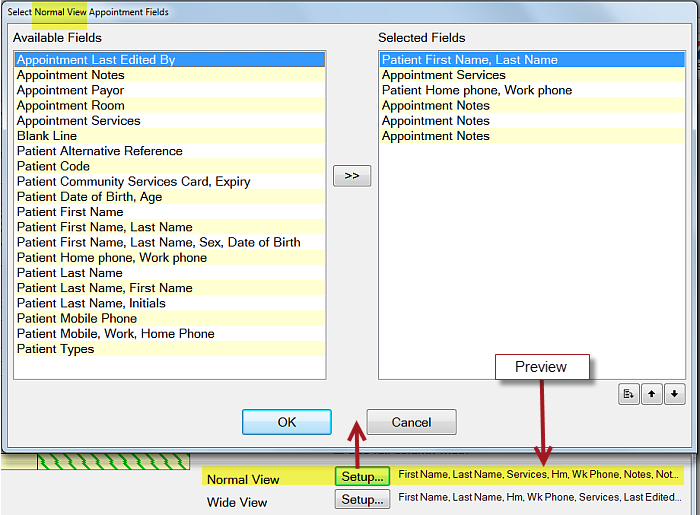
Choose which patient/treatment details are textually displayed in the appointment block, and in what order, for views where the columns are normal and also for views where the columns are very wide (for example, with a wide screen monitor).
This includes how the patient's name is displayed, the planned procedure, the patient's contact number, relevant notes, and the Patient ID. A 'blank' is also included if you wish to insert blank space between details in the appointment block.
See below for details.
Statuses Setup
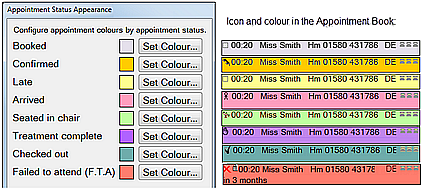
Each appointment book user can configure a set of coloured appointment statuses thatvisually differentiate appointment book blocks according to the patient stages of care within the dental practice: Booked > Confirmed > Late > Arrived > Seated in chair > Treatment complete > Checked out | FTA (Failed to Arrive) (EXACT version 11.3 SP5 and later) See also Configuring Appointment Colour Status | Appointment Colour Status
To select Normal View Appointment Fields
To select Wide View Appointment Fields
To use a picture as a background
Click the 'picture' radio button and use a graphic such as a photo, texture, sketch, logo, etc. as a background.
The graphic must be accessible on your computer/network via the Browse button.
The graphic is displayed at 100% size, so if small it will be 'tiled' (the available space will be filled with multiple 'tiles' of the same image).
If it is larger than the space it is to be displayed in, it will be cropped (truncated) to fit, from the right and bottom of the graphic.
A small sample of the chosen graphic displays in the box next to the Browse button.
Tip: If you choose to use a graphic for the background, choose one that is not too 'busy', or if you can, edit the picture using a graphics program to reduce the contrast, increase the brightness, or reduce the colour depth, to give it a pastel effect. Alternatively, use a 'texture' graphic or other subtle background.