The procedure below will guide you through the most common recall method: to send an SMS message to patients who have a mobile or SMS Home number in their patient record, and a letter to those who do not.
Patients will each receive only one SMS message or one letter.
If you need more information, or you wish to use other recall methods, please see the "Managing Recalls" section.
To recall patients for an appointment
Step 1: Create a recall list.
From the Administration menu, select Manage Recalls...
If any monthly total recall messages are displayed, click OK to close them.
Step 2: Select the patients to be recalled:
When the recall lists window displays, double-click the recall list.
The list of patients in the recall list will be displayed. (Usually, you would contact them all, but if there are any you do not wish to be in the list, click the checkbox at the left-hand end of the line to remove them).
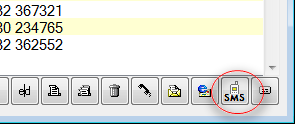
Step 3: Select and configure the SMS recall method:
At the bottom right-hand corner of the window, click on the SMS button:
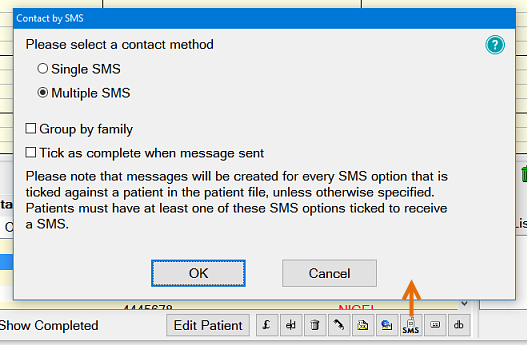
The 'Contact by SMS' dialog is displayed: If you wish send family SMS's together, tick the 'Group by family' checkbox.
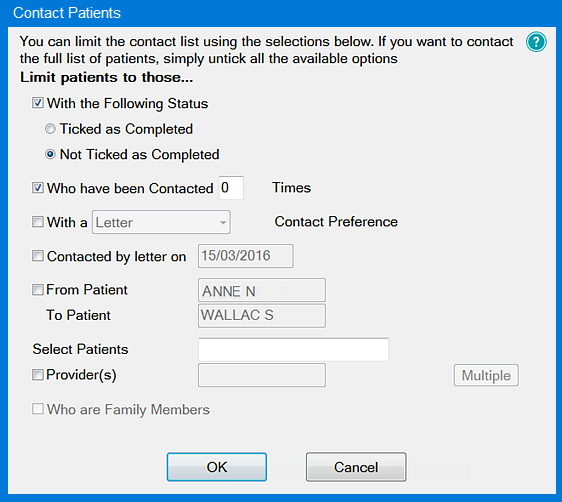
Click the button. The 'Contact Patients' window is displayed:
Tick the checkbox next to "Who have been contacted ... times", make sure it says "0 times". (This will ensure those patients who have already been contacted are not contacted again).
If you wish to limit the recalls to just those for a particular provider, or just a particular recall type, select the appropriate boxes, otherwise accept the other defaults.
Click the button when done.
Step 4: Stagger SMS: what you choose for this option depends on how many patients were in your original list.
If the list is short, then select "Send all SMS straight away".
If the list contained many patients, you can click "Stagger SMS sending", and edit the delivery times so that your receptionist isn't swamped with lots of patient reply calls all at once.
Click the button when done.
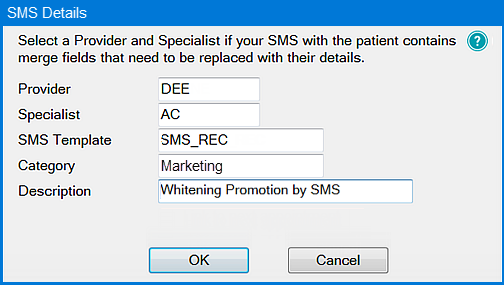
Step 5: SMS Details
If the defaulted Provider isn't the one the patient appointments are with, click in the 'Provider' field and either type the appropriate code, or use the (list) or (up/down) buttons to select the code. Generally, merged information related to a specialist wouldn't be required for a recall, but if this is to appear in the SMS, select the appropriate code in this field. The SMS template to be used for recalls can likewise be selected. Category and Description are used on the Contacts tab and elsewhere in EXACT for easy identification of patient contacts (so that you can see what an SMS, letter, email, etc. are about without needing to open the items). Click the button when done.
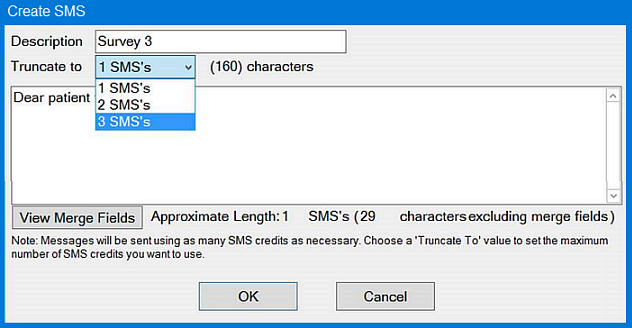
Step 6: Edit the SMS text and details:
If you wish this message to be sent as a 'Flash' message to phones that are Flash-enabled, click the checkbox. (This will mean the message is displayed immediately on the recipient's phone without them selecting it).
Edit the message text if necessary. For example, because the merge fields may make the message longer than the 'Approximate Length' indicated, you may wish to change some of them to actual values so you get a better idea of actual length. In the message above, you could replace [practice.name] and [location.phone]. You may also wish to add extra information relevant to the recall, such as the preferred times to call the practice.
Step 7: Send the message.
Once you have finished editing the message and clicked the button, the recall messages will be either sent immediately, or - if you have set up staggered recalls - queued for sending at scheduled times. If the latter, you can see them in the Email Outbox, by clicking on the Email outbox icon icon on the top right of the EXACT screen:
If you wish to view more info about the SMS, you can hover your mouse cursor over the message to display a tooltip with the message contents.
If you hover it over the graphic in the column, a tooltip will tell you when it is scheduled to be sent.
If you hover it over the graphic in the column, a tooltip with the system status will be displayed. (In this example, there is an error because the connection to the gateway is not set up correctly).
Step 8: Select patients to whom recall letters should be sent.
Go back to the recall list (it should still be displayed on screen). There should now be an icon in the 'Contacts' column for those patients who were selected to be recalled by SMS:
SMS appointment reminder sent to recipient
SMS message received by gateway (not yet delivered)
SMS delivery failed (where SOE is the SMS provider; password is wrong, insufficient credit, etc.)
SMS status unknown (TXTConnecxions / Icetrak / 4Production)
SMS failed or not sent to gateway. (With SOE as the SMS provider, if you are using staggered recalls, and there is a clock symbol in the column this icon means that the SMS is waiting to be sent at the scheduled time.)
SMS status unavailable (other SMS providers)
For the remaining patients, the 'Contacts' column will be empty. These are the ones to whom a letter will be sent.
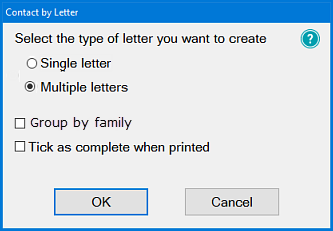
Click the 'Write to the selected person' button: The 'Contact by Letter' dialog is displayed:
Click the 'Group by Family' checkbox if you wish to have family member's letters printed together (for inclusion in one envelope), otherwise leave the default settings, and click the button.
When the 'Contact Patients' dialog is once again displayed, tick the checkbox next to "Who have been contacted ... times", to make sure it says "0 times". (This will ensure those patients who have already been contacted by SMS are not contacted again).
If you wish to limit the recalls to just those for a particular provider, or just a particular recall type, select the appropriate boxes, otherwise accept the other defaults.
Click the button when done. The Document Details window is displayed.
Step 9: Document Details dialog - as with the SMS message, there are merge fields that are provider-specific, so you may need to select the appropriate provider.
From the templates displayed, choose the appropriate one for a recall letter.
If you need to edit the details, click the button to edit the document. The document will be opened in Presentation Manager if it is installed.
When the recall letters are ready to send, click the button to print them. If you need labels for the envelopes, you can click the Print Labels button to access the 'Print Mailing Labels' dialog.