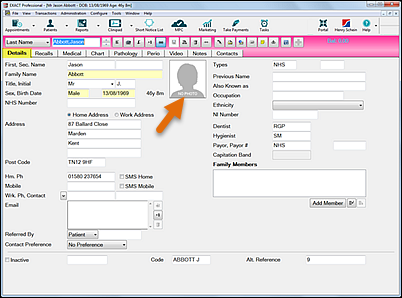
Add a photo to the Patient Details screen either by selecting the photo from a folder or by capturing a photo from a camera feed configured on the EXACT computer.
Benefits:
A patient photo enables practitioners to conveniently recognise patients in the Patient File and in other windows such as the Edit Appointment window and CTI Window.
This has multiple benefits, including improved engagement with patients.
For example it enables a Receptionist to recognise and greet a booked patient by name as that patient enters a busy Reception.
Requirements:
The photo placeholder only displays in the Details Tab when EXAMINE or EXAMINE Pro is registered to your practice.
To capture a photo from EXACT you also need:
An active camera / webcam set up and configured on the capturing computer.
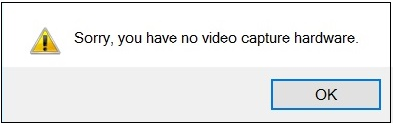
If the camera is not setup and configured you will see this message when you attempt to capture a photo:
In this case your IT technician should be able to correctly setup the camera on the computer.
The camera activated within the EXACT Settings.
Whether yours is activated or not depends on historical variables. If it is de-activated, when you attempt to capture a photo nothing will happen at all.
Please contact Support for help in this case.
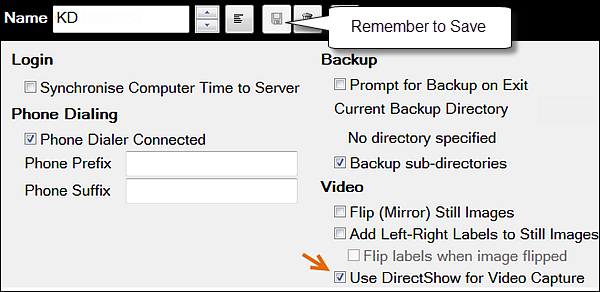
(Possible troubleshooting measure) You may need to activate DirectShow for video, depending on your computer.
Select Configure > Computer Settings... and tick the checkbox Use DirectShow for Video Capture:
Options:
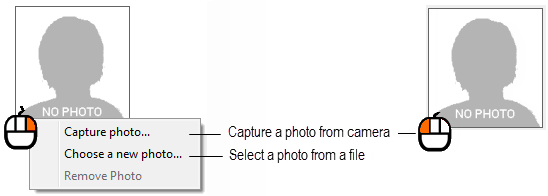
Add a photo by capturing an image from a connected camera such as a webcam
Add a photo by selecting a saved image from a folder
Remove the current photo
Instructions:
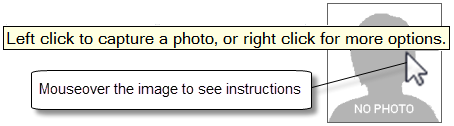
Use mouse right and left clicks:
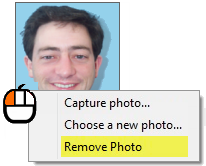
Right-click the image for a context menu.
Left-click the image to start capturing a photo from a camera configured on the computer.
The Remove Photo option becomes active only when a photo is already configured:
To capture a photo from a camera configured on the EXACT computer
Position the patient in front of the camera.
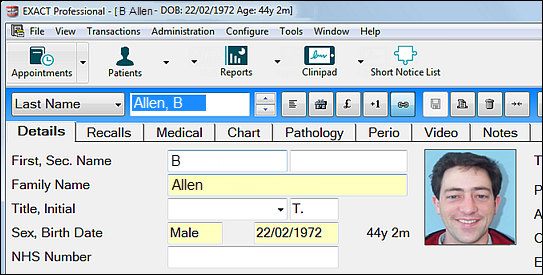
In the patient's file, select the Details Tab to display the patient photo blank.
To start the image capture either
Left-click the blank
- or -
Right-click the blank and choose the Capture Photo option.
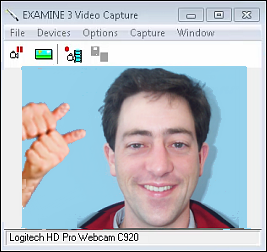
This will open the video capture window:
Optionally drag the corner of the window to resize.
Reposition the patient if necessary.
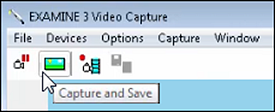
WHen you are ready to capture, select the Capture and Save button:
This will capture the current image in the camera video feed and display it in a crop-and-save window.
Drag the cropping rectangle to select the best patient image (Note the instructions below the photo):
Select Save to display the photo in the Details tab:
Repeat the above procedure if the photo isn't satisfactory.
To add a saved patient photo from a folder
Take a photo of the patient and save it in an appropriate folder on the computer.
In the Details Tab for the patient, right-click the photo blank and select Choose a New photo...
This will open the EXAMINE or EXAMINE ProImage Picker:
If the image you want isn't shown in the Available Images pane, click the drop-down menu next to the Folder field to find the folder containing patient photos. If the appropriate folder isn't displayed, click the Find Other Files... button and browse to the folder containing patient photos.
View a larger image in the window by hovering your mouse cursor over the image thumbnail:
Select the appropriate photo from those available.
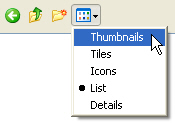
TIP:If you are not sure of the image name, select "Thumbnails" from the options available under the 'View menu' button of the browser window; this will allow you to preview the image files making it easier to select the right one (see below).
To change the patient photo
Right-click the existing photo and select Remove photo:
Once the photo is removed, right-click the photo blank and either capture a photo or select a photo from a folder, as described in the above procedures.
For more details about patient images, please refer to the EXAMINE Pro section.