Purpose:
Practices need to manage a variety of written and verbal consent processes.
From v12.1 Providers can capture some of the written consent form signatures required from patients directly by means of Clinipad in the clinic.
Consent Forms follow the same principle and procedure as Terms and Conditions. The practice saves custom text to a Clinipad Consent Form that a Clinician presents to patients for signing on Clinipad. The signed result is then available as a PDF file and can be viewed in the chart screen.
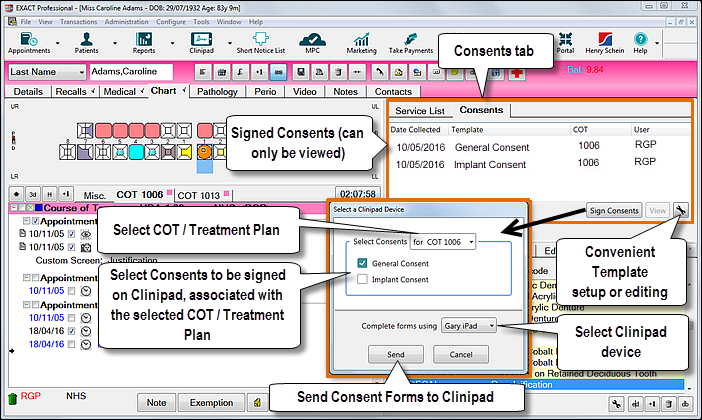
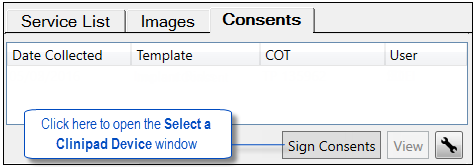
Providers manage this procedure through a Consents tab in the Charting screen. This Consent tab is only applicable to Clinipad practitioners. It provides a way for practitioners to replace assigned paper consent processes and move over to electronically stored documents.
It is only available through the chart tab and there is no equivalent process for paper users.
The Consent activity tab can be configured to display on the chart tab for all Providers where the practice has Clinipad installed.
Features:
A template is made up of a framework PRX over which text is positioned in preset areas. This limits the template to only basic text formatting (text, spaces and carriage returns), as for the terms and conditions document.
Benefits:
Requirements:
A default stationery template is OK, but if not configured the practice needs to pick a template and assign it to the Consent Form (SOEStd1.277) in printing setup.
See also: Configuring Clinipad Consent Forms
To use Clinipad Consent Forms (Provider with a patient in the clinic)
If you don't see a Consents tab, refer to Configuring Clinipad Consent Forms for instructions.
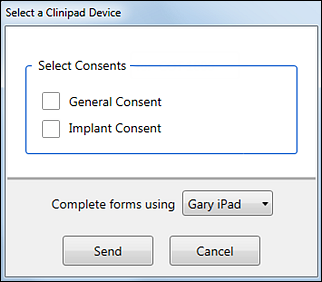
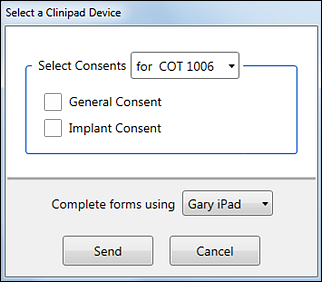
This opens the Select a Clinipad Device window:
|
With a single COT / Treatment Plan: |
With open COTs / Treatment Plans: |
|
|
|
Proceed as follows:
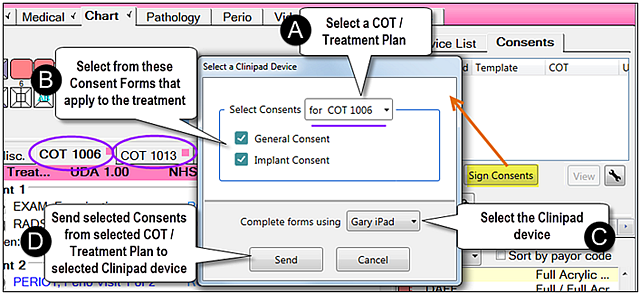
If you wish to apply the consent form to a particular treatment, select a COT / Treatment Plan (there could be multiple in your chart, as in the above screenshot example)
You can send a maximum of four consent forms at a time to a Clinipad session for signing.
If you select more than four the Send box will grey out.
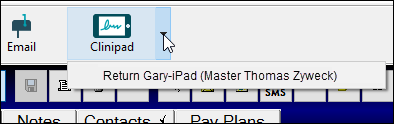
This will start a clinipad session.
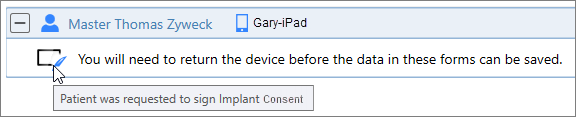
You will see a message to return the Clinipad before the data in the forms can be saved:
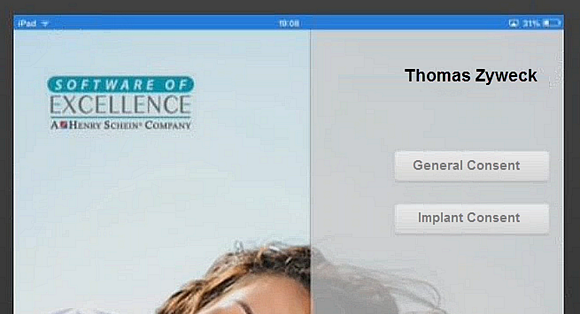
The Clinipad will have the Consent forms listed, with one button for each form. If necessary explain how to open, read and sign the Consents:
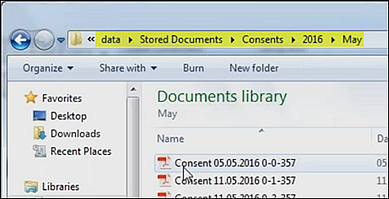
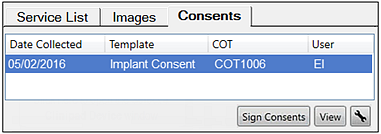
On Clinipad return EXACT saves the signed forms to a folder and creates a record in the Consents tab. This record displays the date, Template name, COT/Treatment Plan and User (Provider):
You can review the signed document by double clicking it, or highlighting it and clicking the View button:
The signed document will open in a PDF viewer, where you can inspect it, check the signature validity, print and file a physical signed Consent Form or Email/Save the PDF.
Storage:
PDF Consents are stored in the EXACT data folder and included in EXACT data backups: