![]()
|
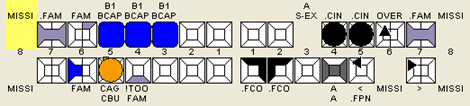
The Up Arrow at the top left hides the Tooth Chart so that the Current Course of Treatment area can display more information. If the Course of Treatment is extensive, it is easier to plan appointments with the Tooth Chart hidden as more of the treatment is shown. |
|||||||
|
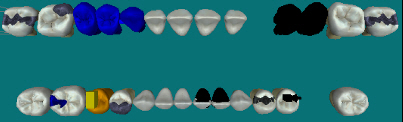
These buttons switch the Tooth Chart between two and three dimensional displays as shown below:
|
|||||||
|
The Treatment History screen shows a record of the patient’s treatment including both historical and current treatment. This screen displays the following information:
Treatment can be sorted in three ways:
Historical Treatment is sectioned into areas for:
The Base and Historical sections display treatment that has been completed and either charged or added to history. The Treatment Planning area displays treatment currently planned for the patient. The treatment text is displayed in the colour of the provider logged on when the treatment was charted. See: Treatment / Tooth History |
|||||||
|
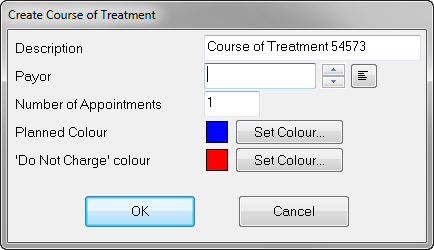
A Treatment plan is automatically created when no Treatment Plan exists and you drag a service to the Treatment Planning area. This button creates a complete Course of Treatment and allows the number of appointments required to be specified. It can be used to distinguish between different treatment options or short term/long term treatment requirements. This button is also used when creating a Private Course of Treatment for a patient that has a designated payor. When this button is initially clicked, the Payor field will have payor name within it. To change the treatment to Private, highlight the payor name and delete it, so that the screen looks like the one below, with the Payor field empty. This will then create a Private Course of Treatment.
|
|||||||
|
The Treatment Timer, located beside at the top right of the Treatment Planning Area, records the length of time treatment actually takes. This is very important if operating time-based billing, e.g. charge for treatment per hour. The timer starts when the ‘Chart’ tab is opened or when selecting a patient from the ‘Arrivals’ Door. Using this feature consistently allows accurate analysis of chair usage through the ‘Chair Time Analysis’ report. As items are ticked as being completed, the service item time will change from the estimated time - e.g. 10mins for exam - to the actual time recorded by the timer. The timer will reset to zero and begin again, ready for the next completed item. The timer can be paused by clicking on it once with the mouse. The timer will then blink to indicate it is paused. To resume the timer, click on it once more. Ticking the appointment itself at the end of each visit, rather than ticking each individual item as complete, is recommended. This way the time will be divided between all of the services within the appointment. The time will be divided in proportion to the individual service appointment time. |
|||||||
|
The ‘Bin’ icon is used to remove individual services, appointments and Courses of Treatment from the Current Course of Treatment area. To remove a Service, Appointment or Course of Treatment, drag it to the Bin. Alternatively items can be deleted by clicking on them with the right mouse button and choosing ‘Delete’ from the menu that appears. |
|||||||
|
The patient’s regular dentist is displayed beneath the Treatment Planning area. If the dentist who is treating the patient is the regular dentist these initials will be in black text, but if the dentist treating the patient is different to the regular one, the initials of the regular dentist will be displayed in red text, as in this example. |
|||||||
|
If a patient has an anaesthetic preference noted in the ‘Medical’ tab, this information also displays in red text beneath the Treatment Planning area. |
|||||||
Payor |
The name of the normal payor for the patient, e.g. 'NHS', 'HIC', etc., is displayed underneath the Treatment Planning area, next to the patient’s regular dentist. As treatment is charted, it will automatically default to the selected payor’s fees unless otherwise specified. |
|||||||