This is a form of automation that saves time in the clinic.
For example, you could create a series of Quick Notes for the types of anaesthetic administered, then simply add the appropriate note rather than repeatedly typing in the anaesthetic names.
If you create a long list of options, to speed selection you can group them by Type, and then select Quick Notes from the appropriate Type groupings.
To add a Quick Note to a service item
(Assumes that QuickNotes have already been created)
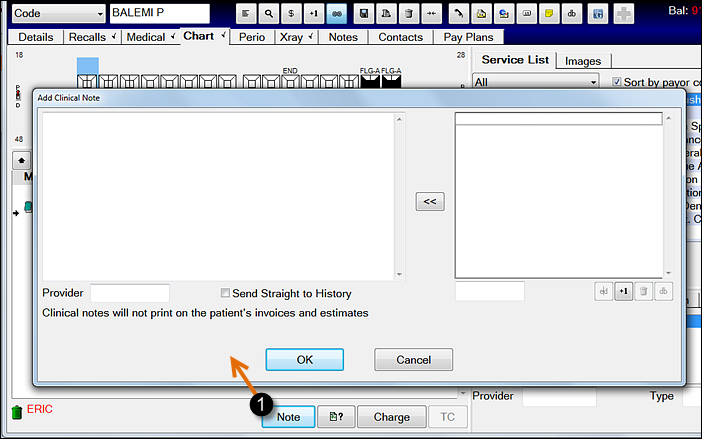
In the treatment area, click to select the service item to which you wish to add the Note.
Click the Note button to open the Add Clinical Note window.
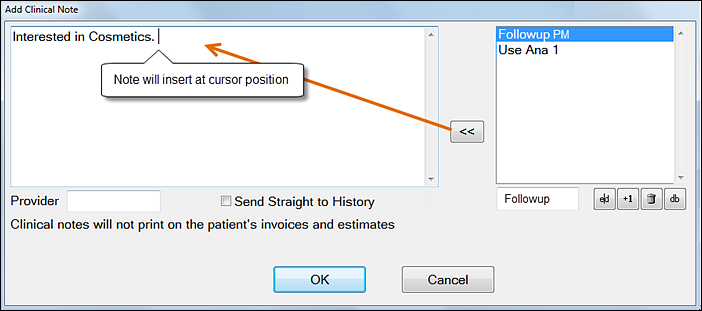
The Quick Notes are listed in the right pane. You can type into the left pane and insert Quick Notes into the left pane at the cursor location in the left pane.
In the left pane, optionally type text, and click at the place where you want to insert the Quick Note.
Click to select a Quick Note in the right pane, then click the [<<] button (or double-click the Quick Note) to move it to the cursor location in the left pane.
If you've created Types, first select the appropriate Type to display a subset of Quick Notes from which to select.
Repeat as necessary until you've constructed your Clinical Note.
Optionally tick the [ ] Send straight to History checkbox.
Purpose: Sending straight to History bypasses the Note's display in the treatment planning / course of treatment area. You can see it listed in History by clicking the [ H ] History button. The Note remains editable in History up until midnight of the current day.
If you do not tick this checkbox, the Note will list in the treatment plan / course of treatment area. From there you still have the option to tick it, right-click and select [ ] Send Completed to History.
Select a Provider.
Click OK.
If you opted to list the Note in the treatment area:
It will display directly below the service item that you initially selected.
So long as this Note is not ticked (as Complete), you can drag it to a different position anywhere in the list of treatments or you can right-click > Delete it.
If you tick and Charge this Note it will list as a zero-value Invoice transaction in EXACT, and as such it will also be flagged for reporting.
You can double-click to edit it from the [ H ] History list up until midnight of that day.
In keeping with legislation you cannot Delete the Note once it is sent to history.
You can Void the Note, which hides it from view and requires you to tick the Show Void checkbox to see it again.
To create Quick Notes
Open the chart tab for any patient, then click the Note button to open the Add Clinical Note window:
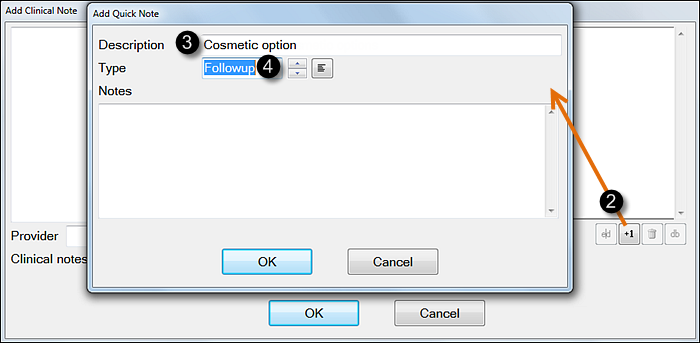
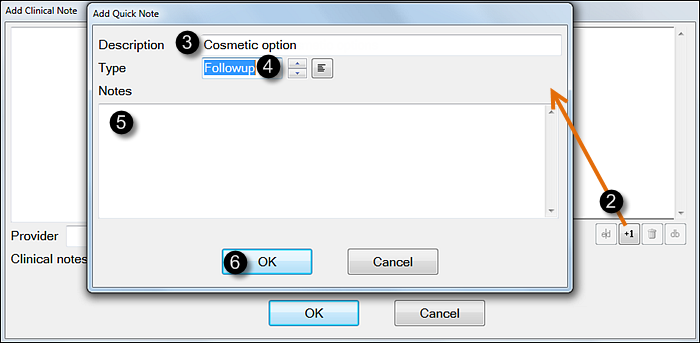
Select the [+1] button to open the Add Quick Note window:
In the Add Quick Note window type a Description for this Note.
Optionally select a Type, if you've already created these (if you haven't, the procedure to create them is covered below).
Why Types? With a patient in the clinic you'll want to use Quick Notes in a hurry, and in a long list of Quick Notes they are quicker to locate when grouped by Type.
To create Types:
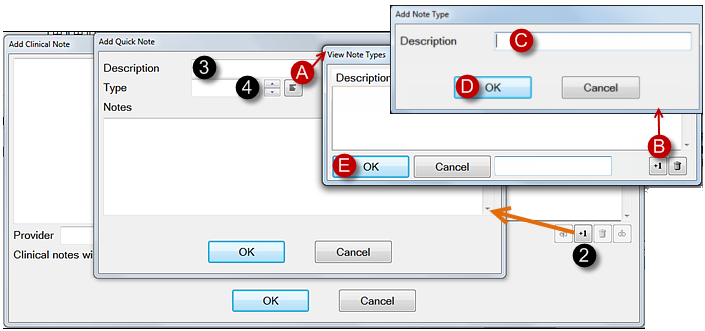
Click the selector to open the View Note Types window.
Select the [+1] button to open the Add Note Type window.
NOTE: From v12.4 editing of Note Types is removed from the View Note Types window, resulting in a subtle change in behaviour...
Previously, double-clicking on a Note Type in this window would display the Edit window.
Now, double-clicking is the same as clicking the OK button, effectively choosing the selected record.
To "edit" a Note Type, delete and then re-create it.
Type a Description to be able to identify this Type that you're creating.
Select OK and then repeat the process to create as many Types as required (you can always edit or Delete them, now or later).
Select OK to return to the Add Quick Note window.
Type the Quick Note itself. This is the text that will be inserted into a Clinical/Invoice Note.