Issuing Prescriptions

To issue Prescriptions

  1. Select the patient in the Patient Details window, and select the Chart tab.
  2. Select the Prescriptions tab in either the upper or activity bar sub tabs (depending how you configured the Activity Bar / Sub Tabs).
  3. At the bottom of the Prescriptions tab pane, click the +1 button (Add a new Prescription):

  4. A Create Prescription window displays:

    Create Prescription

    Notes:
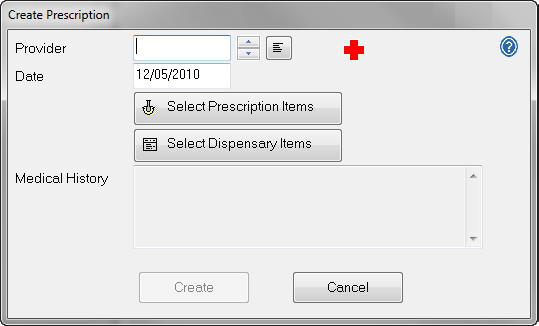
    If the patient has a medical alert displayed in their Patient Record, it will also be displayed in this window (as in the example above) in case the condition affects their medication.

    Any notes from their medical history will display at the bottom of the window.

    Before prescribing any medication, check the patient’s full medical history. While some medical alert information is presented in the Prescription window, this is intended as a prompt when creating a prescription, and is not a substitute for reviewing the patient's full medical record in the Medical tab.

  5. If you are logged in as a provider, your ID will automatically appear in the Provider field. If not, use the list button to select the provider who is authorising the Prescription.
  6. The Date field will already have today’s date. If the Prescription date is to be different, click in the field and use the button to change it.
  7. Click the Select Prescription Items button to select prescription items, or the Select Dispensary Items button to add items from the Dispensary.

    The procedure for each is the same. A window displays:

    View Prescription Items

  8. To select the items you wish to prescribe, click the checkbox next to the item. If you make a mistake, click a checkbox again to de-select that item.
  9. If a listed item has incorrect details, highlight the item by clicking it and then clicking the Edit button, and then editing the item.
  10. If the item you want to prescribe is not listed, but you know its details , click the +1 button to open the Add Prescription window, and add the item. Once you have saved it to to the database, it will be listed in this window and you can add it to the patient's prescription.

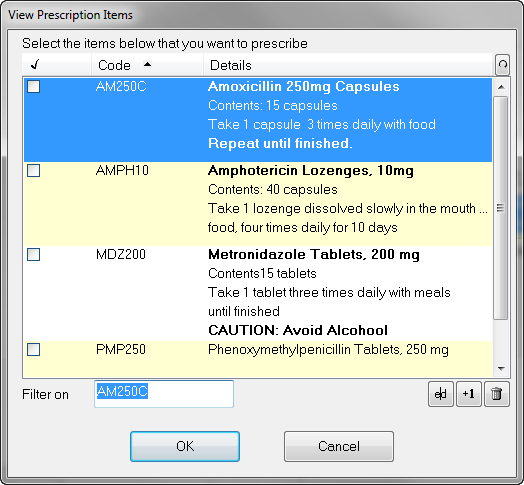
    TIP: If there is an existing item similar to one you wish to dispense or prescribe, you can choose this item and edit the details at the time you print the prescription or print the dispensary item.

  11. When you have selected all the items you wish to prescribe to the current patient, click the OK button.
  12. If you have just added prescription items and wish to add dispensary items as well, repeat the above procedure from the point of selecting the button, using the Select Dispensary Items button.
  13. When you have completed adding all items, click the Create button Create button to create the prescription record.
  14. Once a prescription is issued to a patient, a record is stored in the Prescriptions tab for future reference.

See also...

Prescriptions Tab

Viewing a Patient’s Prescriptions

Print Prescriptions

Printing a Dispensary Item

Next >>

Viewing a Patient’s Prescriptions