|
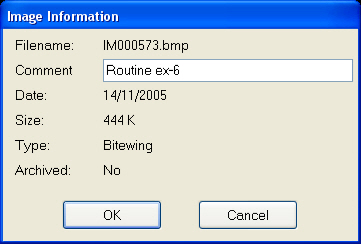
 The ‘Information’ button displays details about the selected image: The ‘Information’ button displays details about the selected image:
|
|
 The ‘Edit’ button allows changes to be made to a selected image. The ‘Edit’ button allows changes to be made to a selected image.
|
|
 This button will permanently delete the selected Xray image. This button will permanently delete the selected Xray image.
|
|

The ‘Brightness’ slide bar brightens or darkens the selected image. When sliding the bar the amount of added or subtracted brightness is displayed:

|
|
 
Similarly the ‘Contrast’ and ‘Depth’ bard control other aspects of the image’s appearance.
|
|
 If changes need to be reversed, the ‘Reset’ button will return the image to its original appearance. If changes need to be reversed, the ‘Reset’ button will return the image to its original appearance.
|
|
 Clicking on the ‘Auto’ button starts and stops and automatic adjustment process for the slide bar option last used. Clicking on the ‘Auto’ button starts and stops and automatic adjustment process for the slide bar option last used.
|
|
 The ‘Grid’ button applies a mesh grid to the image. The ‘Grid’ button applies a mesh grid to the image.

|
|
 The ‘Colourise’ and ‘Black and White’ button allows image to be viewed using colours to identify areas of the same or similar density, or in monochrome The ‘Colourise’ and ‘Black and White’ button allows image to be viewed using colours to identify areas of the same or similar density, or in monochrome
|
|
 The ‘Print’ button prints the image on the default windows printer. The ‘Print’ button prints the image on the default windows printer.
|
|
 The ‘Close Views’ button allows the number of panes in the window to be changed: The ‘Close Views’ button allows the number of panes in the window to be changed:

|


