Scanning Xrays

To scan Xrays

  1. Click on the Patient File and select a patient in the Details tab.
  2. Click in the ‘Xray’ tab; the following window will appear:

  3. Click on the button to open the ‘Xray Scanning window as shown below:

  4. The ‘Date’ field will default to Today’s date or can be changed to reflect the date the Xray was taken.
  5. Enter an appropriate description in the ‘Comment’ field, e.g.: ‘Routine ex-6’
  6. Select the relevant type of Xray using the drop down arrow.
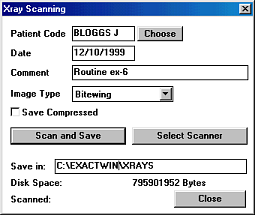
    Options available are: Bitewing, Periapical (PA), Panoramic (OPG), and Other.
  7. If lack of disk space is a problem, check the ‘Save Compressed’ box.
    The ‘Disk Space’ line indicates how much space is available on the Hard Disk Drive to assist with determining this.
    Note, however, that compressed Xrays cannot be displayed in Graphical Estimates.
  8. The ‘Select Scanner’ button allows you to select an alternative scanner if more than one is attached.
  9. Click on the ‘Scan and Save’ button, then refer to your selected Scanning Software instructions to scan the file into EXACT.
  10. Once the image has been saved, the ‘Scanned’ area of the window will will appear similar to the following example:

See also...

EXHANCE Module

Importing Xrays

Viewing Scanned or Imported Xrays

Next >>

Importing Xrays