In the Appointment book window, click on the Print Appointment List ![]() button or press CTRL-R.
button or press CTRL-R.

This will call the ‘Print Appointment Book’ dialog, with the current book and appointment date defaulted. (If required, you can still change the date and book from the defaulted values).
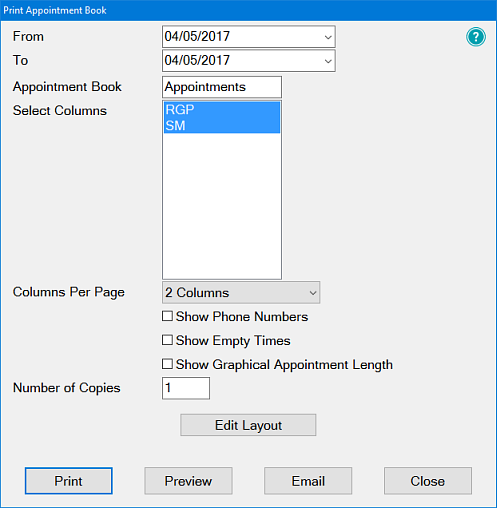
Date |
The date defaults to the current appointment book date, but another date can be entered into the Date field, or can be selected from the drop-down menu, by clicking on the |
Appointment Book |
This defaults to the current appointment book, but you can select another book by clicking in the entry box and selecting one via the |
Select Columns |
By default, all available columns will be printed. If this is not what you require, click on the column names to select or deselect them. |
Columns Per Page |
By default, the report will print with four columns (i.e., four appointment book columns) per page. Click the |
Show Phone Numbers |
Click in the checkbox if you wish to print the patients’ phone numbers on the report. |
Show Empty Times |
Click in the checkbox if you wish the report to show non-appointment times. |
Show Graphical Appt Length |
If you wish to show appointment length as a bar rather than a numerical figure, click in the checkbox. |
|
Print button: When you have the report parameters set as required, click this button to print the report. |
|
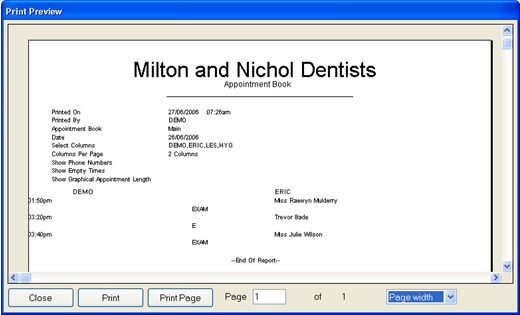
Preview button: Shows you the report as it will appear when printed (see below). |
|
Email button: If you wish to email a copy of the appointment book printout (for example, to one of the providers), click on this button and enter the email details in the dialog displayed. |
|
Cancel button: Click this button to cancel the report. |