Multiple launch points for creating patient letters
Open the Document Details window from the Create a Patient Document button ![]() in multiple locations in EXACT, including:
in multiple locations in EXACT, including:

- or -

![]()
Create from multiple locations
Patient letters can be created from multiple locations such as the patient file, recalls or contact lists by clicking on the Create a Patient document button wherever it is visible.
Patient Contacts tab lists letters
If EXDOC is installed these letter contacts are automatically stored on the patient’s Contacts tab and can be viewed and/or edited by double-clicking on the required letter.
NOTE: Without EXDOC the letter symbol will indicate the creation of a letter, but the actual letter itself will need to be either saved manually on one of the practice's computers or printed in duplicate and the copy held on file.
Letter templates
Letter Templates are used when writing letters. These templates contain the standard layout and wording common to all letters of the same purpose, and merge fields that are automatically resolved with actual data when the letter is processed. For example, all referral letters will contain merge fields for basic information about the patient such as name and date of birth, and may begin with a first sentence of ‘Thank you for seeing…’
See also: ![]()
![]() Portal blog and video: Creating letter templates
Portal blog and video: Creating letter templates ![]()
To contact by Letter

Select the type of letter: Create either a single letter to the selected patient or multiple letters to patients within the contact list.
Select Group by Family if there are several members of the same family, and you want to send one letter for the family.
You have the checkbox option to Tick as complete when printed. If you check this box, EXACT will remove each patient from the contact list when the letter for that patient is printed, leaving only patients on the list with unprinted letters.
With this unchecked the patient is not marked as Complete on the contact list until further manual action is taken. In other words, leave the checkbox unchecked if you want a reminder to take further action.
A Contact Multiple Patients window will appear:
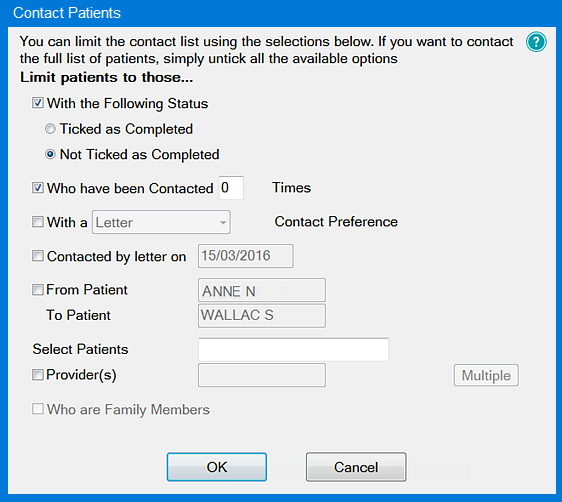
See the Contact Multiple Patients window for details.
The Document Details window displays, as described below.
If you have Presentation Manager enabled, the Document Details window will have a preview window and slightly different fields.
The Document Details window enables you to write to the patient as well as create/modify the Letter Templates that are the basis of the individual letters written.
Letter Templates can include merge fields. These are placeholders for patient, provider, specialist, practice and other details that can be inserted directly into a letter from EXACT, which are replaced with actual data when the letter is processed.
Document Details window:

Complete the following fields (as appropriate) to create the document:
|
|
Provider: Click in the field and use the selectors to select a Provider under whose name the document will be written. Note: If you are logged in as a Provider, your Provider Code will appear here by default, and if the patient has a Provider assigned, that Provider will display by default. |
|
|
Specialist: Click in the field and use the selectors to select a Specialist under whose name the document will be written. |
|
|
Category: This defaults to Admin Document but you can select an alternative type from the list.
There is no limit to the number of Categories that you can create. These Categories are significant in the Patient File Contacts tab (as indicated below), where contacts can be displayed/sorted by the Category. Note also how the template Description field is shown under the Description column:
|
|
|
Description: Type a description for the document content. This will be displayed in the list of contacts. |
|
|
Document Templates pane: |
|
|
Templates: These can be Standard (delivered with the software), created/customised and/or imported. EasyPost templates display the EasyPost icon: Arrange templates by dragging them into folders templates into folders. Edit button |
|
|
Categories: Use these as a means of rationally arranging templates (drag templates into folders). Create any number of Categories. Hover your mouse cursor over a category to display a Delete button. Add categories from three locations in the Document Details screen - see You can also select and add Categories from the Create Template screen. |
|
|
Preview of the selected template. |
|
|
Add new category button:
|
|
|
+1 button opens the Create Template window. See Creating a New Template. |
|
|
Print: Print the selected letter template for this patient. |
|
|
EasyPost: Click to send the template to EasyPost (populated with the selected patient's details) for third party printing, addressing and posting (requires the EasyPost module and Presentation Manager). |
|
|
Preview: Without Presentation Manager this will pop up the template document for viewing. With Presentation Manager, this displays the document preview at right, with merge fields populated with sample patient details:
|
|
|
Cancel button: Cancel the document details and close the window. |


