Drawing on a Tooth

There are two common ways you can draw on a tooth:

To draw on a Tooth

  1. From the patient’s Chart tab, select the required service from the Service List and drag it into the Treatment Plan area.
  2. The following window will appear automatically if your service was set to Drawing:

  3. If your service graphic was set to Filling, first chart the filling normally, then double-click on the chart line in the planning window. From here you can open the Edit Drawing window where the standard filling shape will already be drawn, and you simply tweak the drawing as required.
  4. When using the Drawing graphic, the tooth selected will be the one highlighted on the Tooth chart. If necessary use the button to scroll through the Tooth Chart and select a different tooth, or click a different tooth on the chart.
  5. Hold the left mouse button down and use the mouse pointer to draw on the tooth. While doing so the following functions will be useful:


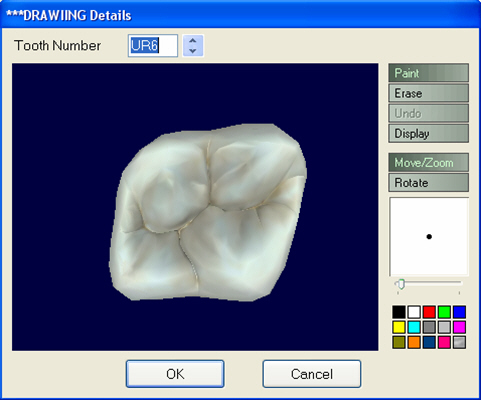
    This is the default option when the window opens. Selecting this button will always re-enable drawing if another option has been selected.


    This will erase any drawing you may have done onto the tooth in the current session. To erase: select ‘Erase’, then keeping the left mouse button depressed click and drag over the area that you wish to erase.


    Selecting this button will ‘undo’ the last change that you made to the drawing in this session. If you wish to undo earlier changes, you must use the 'Erase' function.


    Note: Previously saved drawings cannot be undone or erased.


    Selecting this button presents you with further options for viewing the tooth, as follows:
    Current Drawing, Previous Drawing, Current Fillings, Existing Fillings.


    Selecting this button will move the tooth. Click on the button, a grid will be placed around the tooth; keep the left mouse button depressed and drag to move the tooth.
    Keep the right mouse button depressed and drag to make the tooth image larger or smaller.


    Quicktip: Once you click the ‘Move/Zoom’ button, you do not need to position the mouse cursor over the tooth: just keep the mouse button depressed and move the mouse.


    Selecting this button will rotate the tooth. Click on the button, a grid will be placed around the tooth; keep the mouse button depressed and drag to rotate the tooth.
    The left mouse button rotates the tooth up/down when you move the mouse up/down, and left/right when you move the mouse left/right.
    The right mouse button rotates the tooth image clockwise when you move it to the left, and anti-clockwise when you move it to the right.


    Quicktip: Once you click the ‘Rotate’ button, you do not need to position the mouse cursor over the tooth: just keep the mouse button depressed and move the mouse.


    Drawing size/colour setting

    This shows the current colour of the drawing tool, and its relative size. To change the size, use the left mouse button to slide the control left (smaller) or right (larger) as required.


    The option selected on the colour grid dictates the colour of the drawing on the tooth.

  6. When completed the window will look similar to the following example:

  7. Click OK to save the drawing.

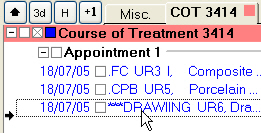
    It will be added to the Current Course of Treatment:
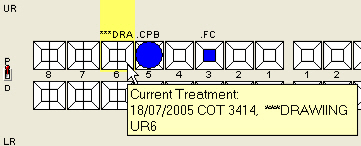
  8. The Tooth Chart will also indicate that a drawing of the tooth exists:

  9. To edit the drawing at any time, double-click on the item in the Treatment Plan to open the ‘Edit Chart Item’ window.
    Clicking on the button within this window will reopen the drawing to view it or make changes.

See also...

Drawing on Teeth in 3D

To Setup a New Drawing Service

Next >>

Pathology Tab