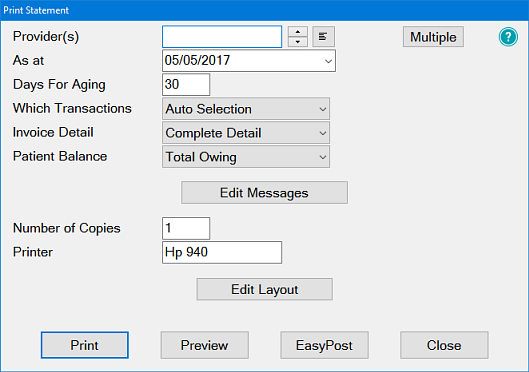
Leave blank to print one statement for transactions processed by all providers (e.g. how much the patient owes the practice).
Select a Provider to print a statement including only transactions processed by/for the selected provider.
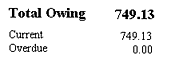
In the example above, any invoices older than 30 days will print on the statement as overdue. Any invoices younger than 30 days (e.g. processed within the last 30 days) will print as current.
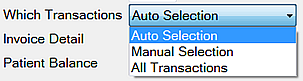
- Auto Selection will print all transactions necessary to show the make up of the Current Balance
- Manual Selection allows selection of specific transactions only
- All Transactions prints all transactions processed for the patient – this could be a lot of detail depending on how long EXACT has been in use
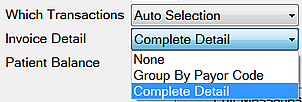
- None will give no invoice details, only amounts outstanding.
- Group By Payor Code groups invoices by the Payor Code
- Complete Detail (recommended) - prints all invoice Details.
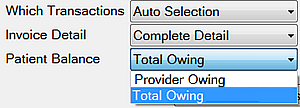
The Total Owing (default) option displays the amount owing for the patient as per the patient transactions window, irrespective of what provider(s) are selected on the report parameters window. In the statement the totals area will display as follows:
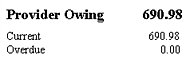
The Provider Owing Toption makes the "Total Owing", "Current" and "Overdue" field on the report display amounts for the selected provider(s) only. In the statement the totals area will display as follows:
Saving: Your Patient Balance selection is saved by EXACT (like all report parameters, on a per-user basis) but note that the Statement and Statement Run reports save the selection separately (i.e. what you select for one of these reports is independent of the other one).
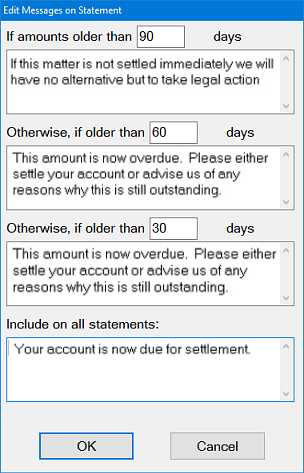
(The Edit Messages window is also available from the Accounts Menu > Statements. The same settings are used for both individual patient statements and statement runs)
- The appropriate message prints automatically on patient statements depending on the patient's number of overdue days: 90, 60 or 30 days.
- The Include on all statements message prints on all statements and can be used at a personal level to communicate with the patient or at a practice level to communicate with your patients.
- Examples of this include: services available, days closed or a Christmas message.
NOTE: If you use this area to communicate with individual patients it is advisable to establish a practice policy to check the messages prior to printing a statement or statement run.
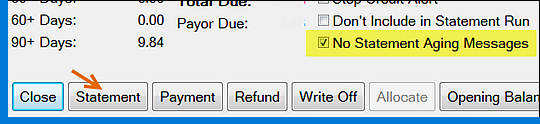
To prevent statement aging messages from printing for specific patients, check the No Statement Aging Messages checkbox on the Transaction Window prior to clicking the Statement button: